들어가며
이전 포스팅 에서는 Hive on MR 환경에서의 Hive 성능 튜닝 과정을 알아봤는데요, 이번 Apache Hive 성능 개선 톺아보기 2탄에서는 이어서 Hive의 또 다른 엔진인 Apache Tez 에 대한 개요와설치 및 빌드 방법, 그리고 Tez 에서의 성능 개선 방안에 대해 알아보도록 하겠습니다.
Hive on Tez 시작하기
Apache Tez 의 공식 페이지에서는 Tez 를 아래와 같이 소개하고 있습니다.
The Apache TEZ®project is aimed at building an application framework which allows for a complex directed-acyclic-graph of tasks for processing data. It is currently built atop Apache Hadoop YARN.
…
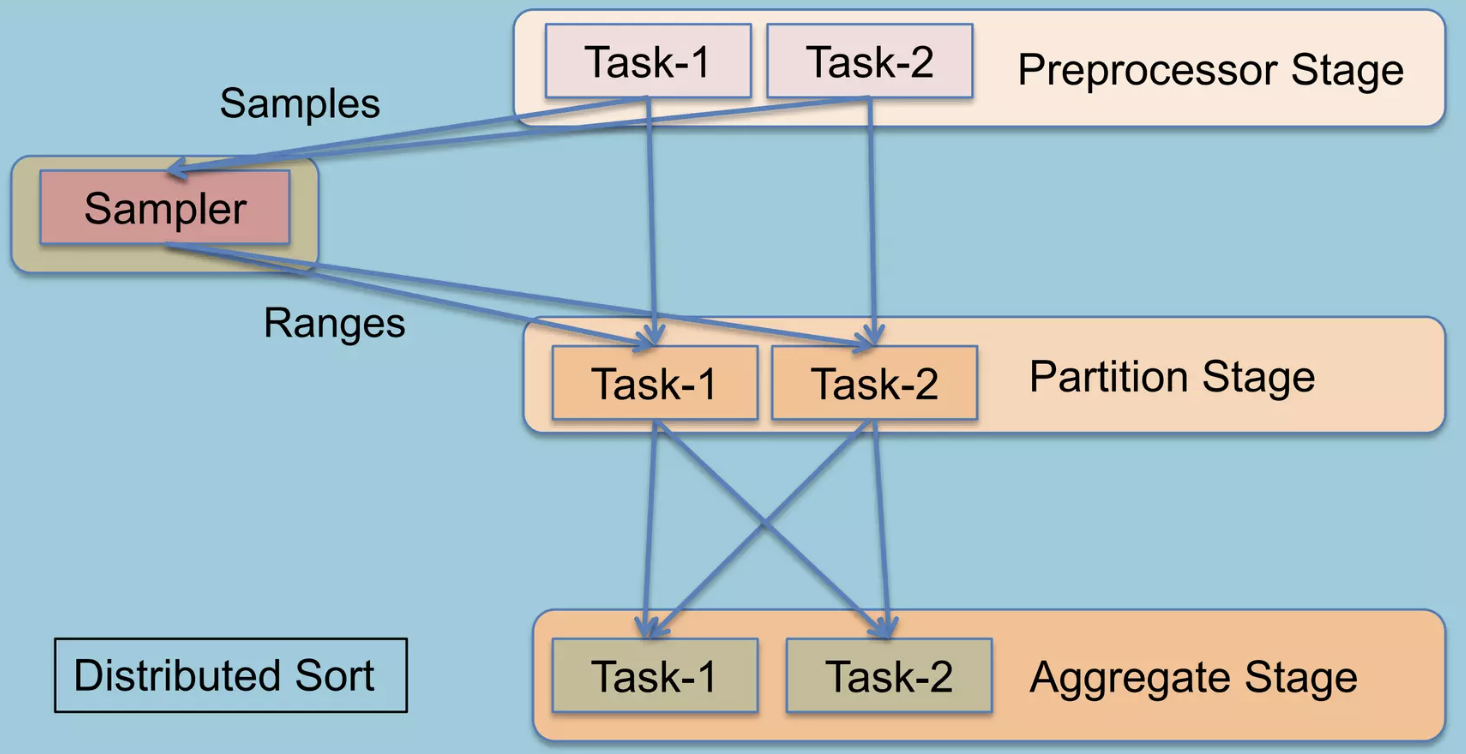
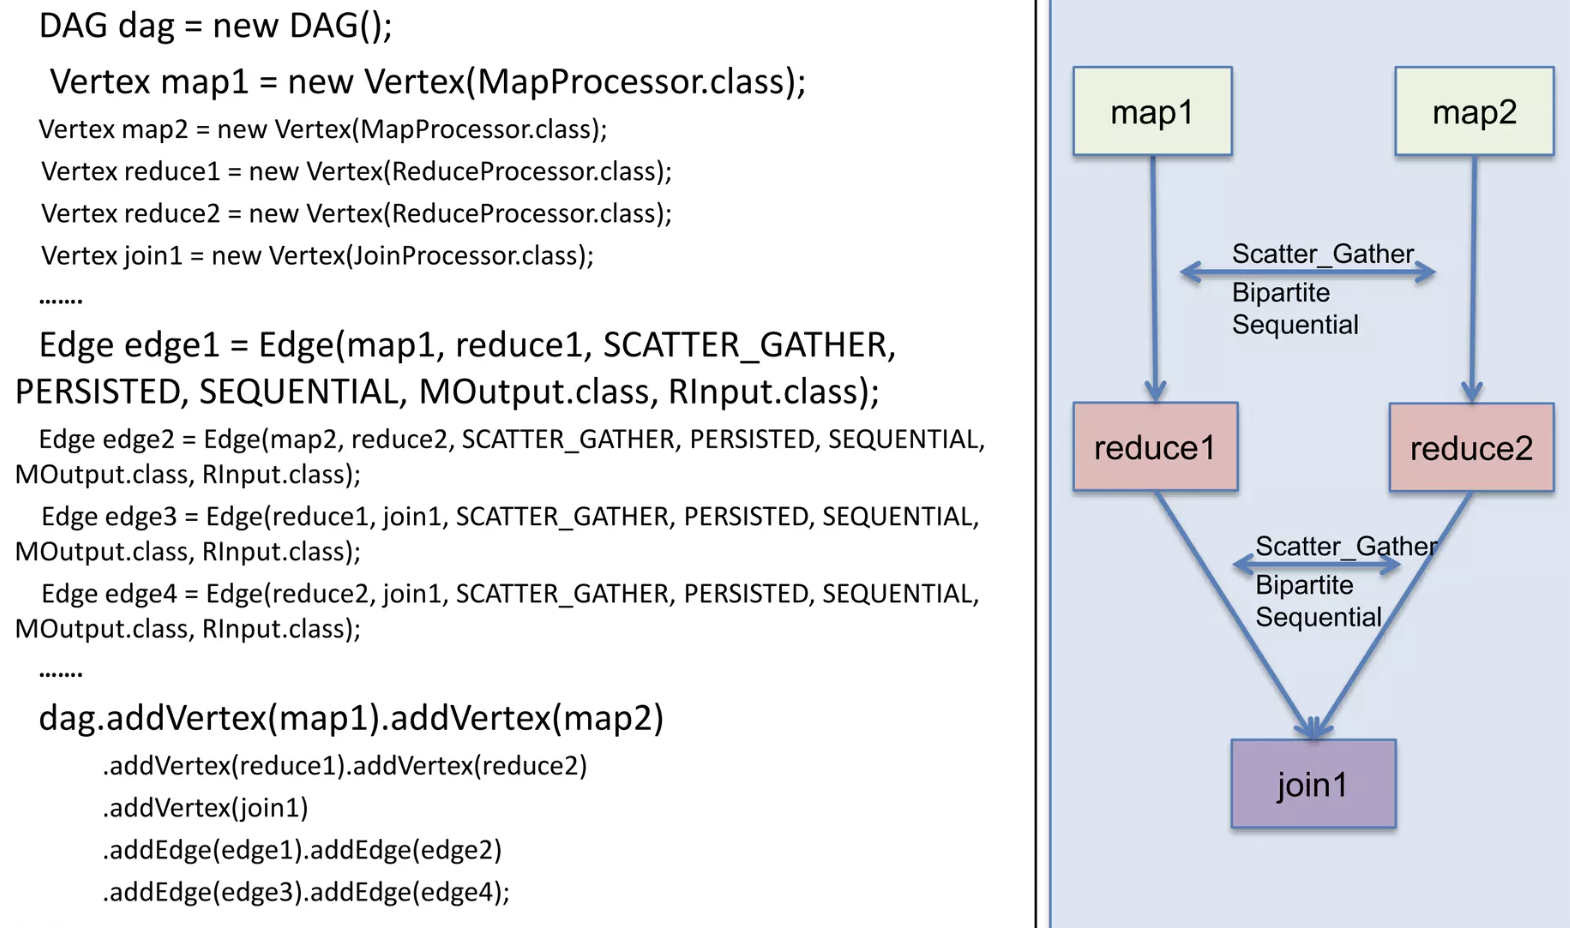
By allowing projects like Apache Hive and Apache Pig to run acomplex DAGof tasks, Tez can be used to process data, that earlier took multiple MR jobs, now in asingle Tez jobas shown below.
복잡한 DAG 형태의 작업을 단일 Tez Job으로 수행할 수 있다는 내용인데요, 함께 소개되는 성능 향상 내용은 아래와 같습니다.
- Performance gains over Map Reduce
- Optimal resource management
- Plan reconfiguration at runtime
- Dynamic physical data flow decisions
Hive on Tez 는 Hive 쿼리의 실행 백엔드로, 쿼리를 DAG(Directed Acyclic Graph) 방식으로 최적화하고 불필요한 MR step 들을 제거합니다. 또한 분산 데이터 처리에서는 최적의 데이터 이동 방법을 사전에 결정하기 어려운데 이를 런타임 중에 실행계획을 최적화(Plan reconfiguration at runtime) 하는 방법으로 성능을 향상시켰습니다.
Hive on Tez 설치하기
Hive on Tez 설치 과정에서 겪은 부분을 짧게 소개해드리겠습니다. 설치는 기존 Hive, Yarn, HDFS 가 설치된 클러스터에 Apache Tez 릴리즈 파일을 올리고 기존 컴포넌트 들과 설정 파일들을 연결하면 되는데, Tez Install Guide에 설치 방법이 친절하게 설명되어 있습니다. Tez의 릴리즈 파일은 아래 두가지 방법을 통해서 가져올 수 있어요.
- 이미 빌드된 라이브러리 파일 사용
- 직접 빌드해서 사용
솔직한 심정으로, 이미 빌드된 라이브러리 사용을 추천드립니다. 저는 Hadoop 3.2.4, Hive 3.1.3, Tez 0.9.2 로 시도하였고 라이브러리를 사용한 경우에 특별한 오류는 발견하지 못했습니다. 직접 빌드하는 방법도 시도했었는데요, 엔지니어의 열정으로(🤣) 직접 빌드까지 해보실 분들을 위해서는 아래 팁들 전달드립니다.
[ 1. protobuf 2.5.0 설치방법 ]
1
2
3
4
5
6
7
8
9
10
11
12
13
14
15
16
17
18
19
20
21
# Install Required Dependencies:
sudo apt update
sudo apt install -y autoconf automake libtool curl make g++ unzip

# Download Protocol Buffers 2.5.0:
wget https://github.com/protocolbuffers/protobuf/releases/download/v2.5.0/protobuf-2.5.0.tar.gz

#Extract the Downloaded File:
tar -xzf protobuf-2.5.0.tar.gz
cd protobuf-2.5.0

#Configure, Compile, and Install:
./configure
make
sudo make install

# Update the Shared Libraries:
sudo ldconfig

# Verify the Installation: Check the installed version to ensure Protocol Buffers 2.5.0 is correctly installed:
protoc --version
[ 2. build 전 pom.xml 변경 ]
1
2
3
4
5
6
# 원하는 tez 버전 checkout
git clone https://github.com/apache/tez.git

git checkout branch-0.9.2

# pom.xml에서 hadoop version 변경
[ 3. build, build error ]
1
2
3
4
5
6
7
8
9
10
11
12
# build command
mvn clean package -DskipTests=true -Dmaven.javadoc.skip=true

# build error
1. Failed to execute goal com.github.eirslett:frontend-maven-plugin:1.8.0:bower (bower install) on project tez-ui: Failed to run task: 'bower install --allow-root=false' failed.
   - root 계정 아닌 계정으로 build
   (해결) 새 계정 hadoop 신규, 공용그룹으로 권한추가

2. [1번과 유사 에러 재발생] Failed to execute goal com.github.eirslett:frontend-maven-plugin:1.4:bower (bower install) on project tez-ui: Failed to run task: 'bower install --allow-root=false' failed. org.apache.commons.exec.ExecuteException: Process exited with an error: 1 (Exit value: 1) -> [Help 1]
    - 상세 에러를 확인해야함 (여러 에러 케이스 발생)
    - `FileSaver.js`의 GitHub 저장소가 더 이상 존재하지 않아 빌드 실패
    (해결) Tez-ui 는 빌드하지 않고, 라이브러리 다운받아 사용 (https://repo1.maven.org/maven2/org/apache/tez/tez-ui/)
추가로 설치과정에서 yarn 에 tez app을 제출했을 때 tez.lib.uris 경로를 yarn, tez 에서 인식하지 못하는 이슈가 있었는데요, 한참을 헤메다가 전체 환경변수가 아닌 hadoop-env.sh 파일에 아래 정보를 추가해 주는 방법이 성공했습니다.
1
2
3
4
5
6
7
########## TEZ 0.9.2 ##########
export TEZ_HOME=/home/user/cluster/tez
export TEZ_CONF_DIR=$TEZ_HOME/conf
export TEZ_JARS=$TEZ_HOME/*:$TEZ_HOME/lib/*

# export HADOOP_CLASSPATH="$HADOOP_CLASSPATH:$TEZ_CONF_DIR:$(find $TEZ_HOME -name "*.jar" | paste -sd ":")"
export HADOOP_CLASSPATH=$HADOOP_CLASSPATH:$TEZ_HOME:$TEZ_CONF_DIR:$TEZ_JARS
결과적으로는 1. 라이브러리/share 경로에 있는 tez.tar.gz 파일을 중앙 hdfs에 업로드하고 (tez-site.xml에서 참조), 2. 각 서버 로컬 디렉토리에도 tez .jar 파일을 복사 (yarn 에서 환경변수로 참조) 하여 사용하는 형태 가 됩니다.
TEZ_UI 설치하기
Apache Tez 는 Tez-ui 라는 별도의 UI 툴을 제공합니다. 다만 별도의 WAS에 war파일을 띄우는 형태로 제공되기 때문에 저는 master 2번 node에 Apache Tomcat 9을 설치하고, 그 위에 Tez-ui 파일을 올려 실행시켰습니다.
설치방법은 간단합니다.
Tomcat을 설치하고, 다운받은 war 파일을 ${TOMCAT_HOME}/webapps/ 경로에 압축해제 합니다. 그리고 아래 2개 설정파일을 변경해주면 됩니다. (저는 /opt/tomcat 경로에 tomcat 9을 설치했고, 10.0.x.x 는 제 홈 네트워크 VPN IP address 입니다.)
[ 1. /opt/tomcat/conf : server.xml 에서 기본 실행포트 변경 ]
1
2
3
4
5
6
7
8
9
10
11
12
 <!-- A "Connector" represents an endpoint by which requests are received
         and responses are returned. Documentation at :
         Java HTTP Connector: /docs/config/http.html
         Java AJP  Connector: /docs/config/ajp.html
         APR (HTTP/AJP) Connector: /docs/apr.html
         Define a non-SSL/TLS HTTP/1.1 Connector on port 8080
    -->
    <Connector port="9999" protocol="HTTP/1.1"
               connectionTimeout="20000"
               redirectPort="8443"
               maxParameterCount="1000"
               />  <!-- 기본 8080포트는 다른 프로세스와 충돌 가능성이 있어 변경해주었습니다. -->
[ 2. /opt/tomcat/webapps/tez-ui/config : configs.env 에서 timeline url 설정 ]
/**
 * Licensed to the Apache Software Foundation (ASF) under one
 * or more contributor license agreements.  See the NOTICE file
 * distributed with this work for additional information
 * regarding copyright ownership.  The ASF licenses this file
 * to you under the Apache License, Version 2.0 (the
 * "License"); you may not use this file except in compliance
 * with the License.  You may obtain a copy of the License at
 *
 *     http://www.apache.org/licenses/LICENSE-2.0
 *
 * Unless required by applicable law or agreed to in writing, software
 * distributed under the License is distributed on an "AS IS" BASIS,
 * WITHOUT WARRANTIES OR CONDITIONS OF ANY KIND, either express or implied.
 * See the License for the specific language governing permissions and
 * limitations under the License.
 */

ENV = {
  hosts: {
    /*
     * Timeline Server Address:
     * By default TEZ UI looks for timeline server at http://localhost:8188, uncomment and change
     * the following value for pointing to a different address.
     */
    timeline: "http://10.0.1.1:8188",

    /*
     * Resource Manager Address:
     * By default RM REST APIs are expected to be at http://localhost:8088, uncomment and change
     * the following value to point to a different address.
     */
    rm: "http://10.0.1.1:8088",

    /*
     * Resource Manager Web Proxy Address:
     * Optional - By default, value configured as RM host will be taken as proxy address
     * Use this configuration when RM web proxy is configured at a different address than RM.
     */
    rmProxy: "http://10.0.1.1:8088",
  },

  /*
   * Time Zone in which dates are displayed in the UI:
   * If not set, local time zone will be used.
   * Refer http://momentjs.com/timezone/docs/ for valid entries.
   */
  //timeZone: "UTC",

  /*
   * yarnProtocol:
   * If specified, this protocol would be used to construct node manager log links.
   * Possible values: http, https
   * Default value: If not specified, protocol of hosts.rm will be used
   */
  //yarnProtocol: "<value>",
};
Hive on Tez vs Hive on MR
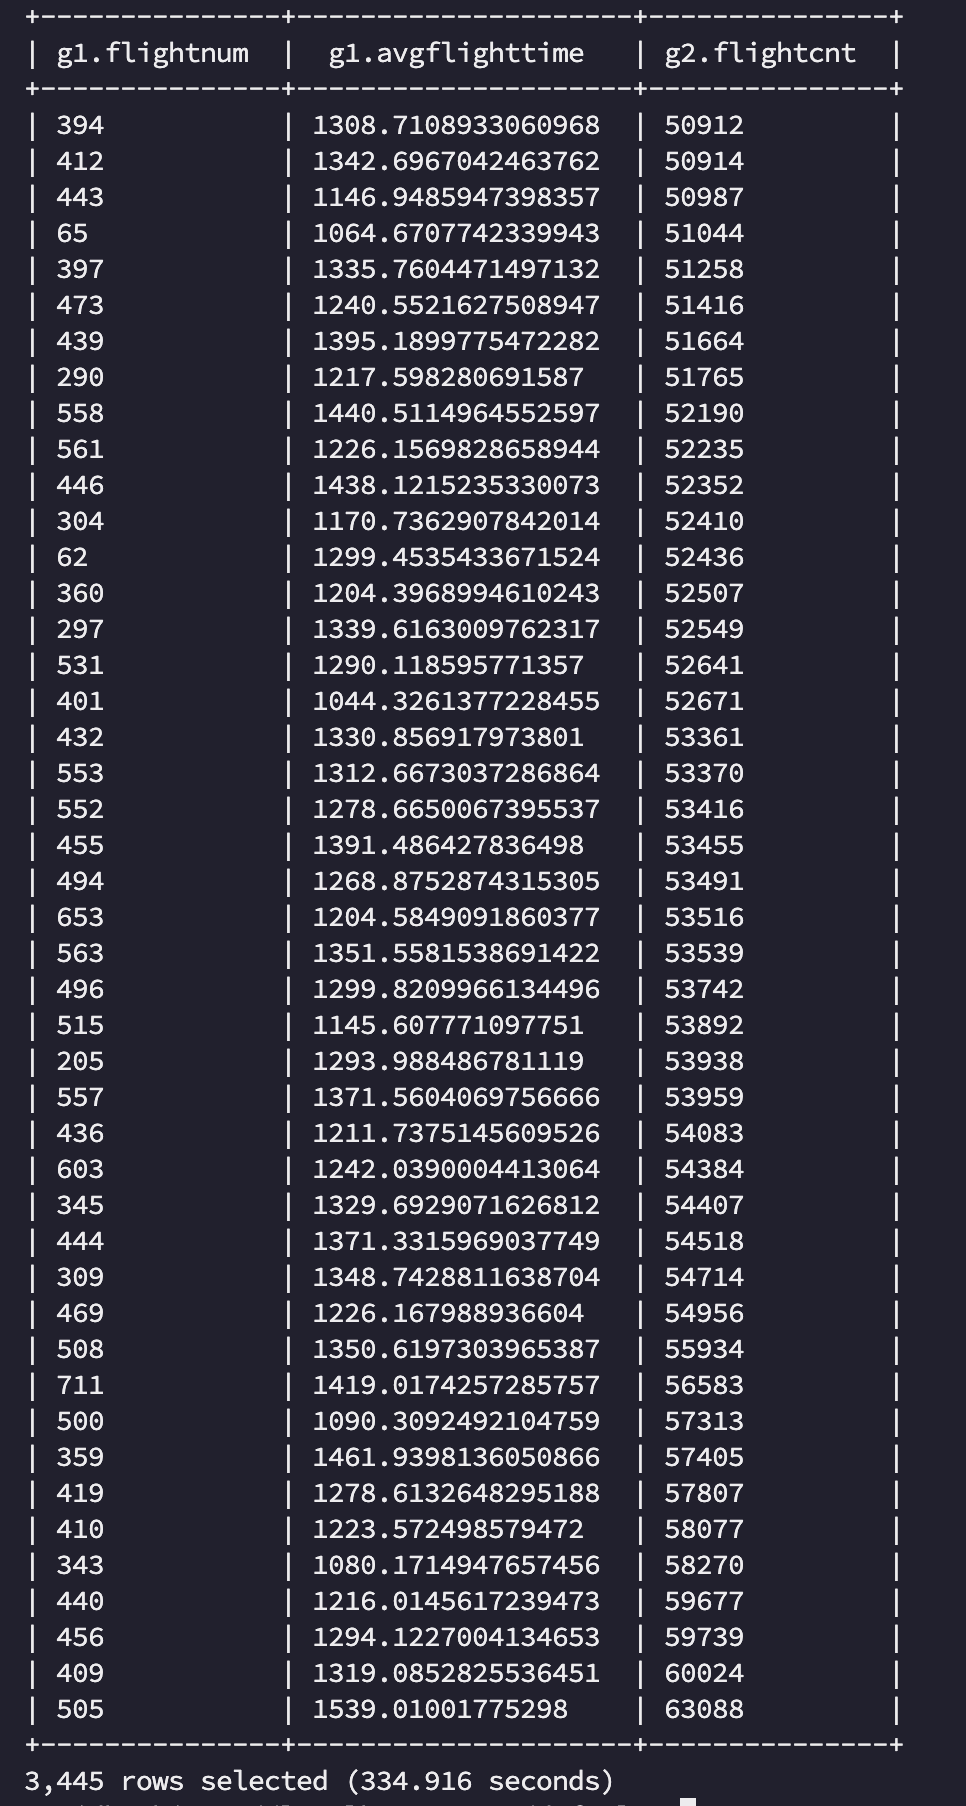
본격적으로 Tez, MR을 비교해보기 위해 Join 과 Group by 문을 추가해 이전보다 조금 더 복잡한 쿼리로 실행해봤습니다. 기존의 limit 절은 map/reduce /shuffle 단계 없이 바로 hdfs 파일로 보내기 때문에 제외하였습니다. 데이터는 동일한 데이터를 사용했습니다.
1
2
3
4
5
select g1.FlightNum, g1.avgFlightTime, g2.flightCnt
from (select FlightNum, avg(deptime) as avgFlightTime from airline group by FlightNum) g1
join (select FlightNum, count(FlightNum) as flightCnt from airline group by FlightNum) g2
on (g1.FlightNum = g2.FlightNum)
order by g2.flightCnt;
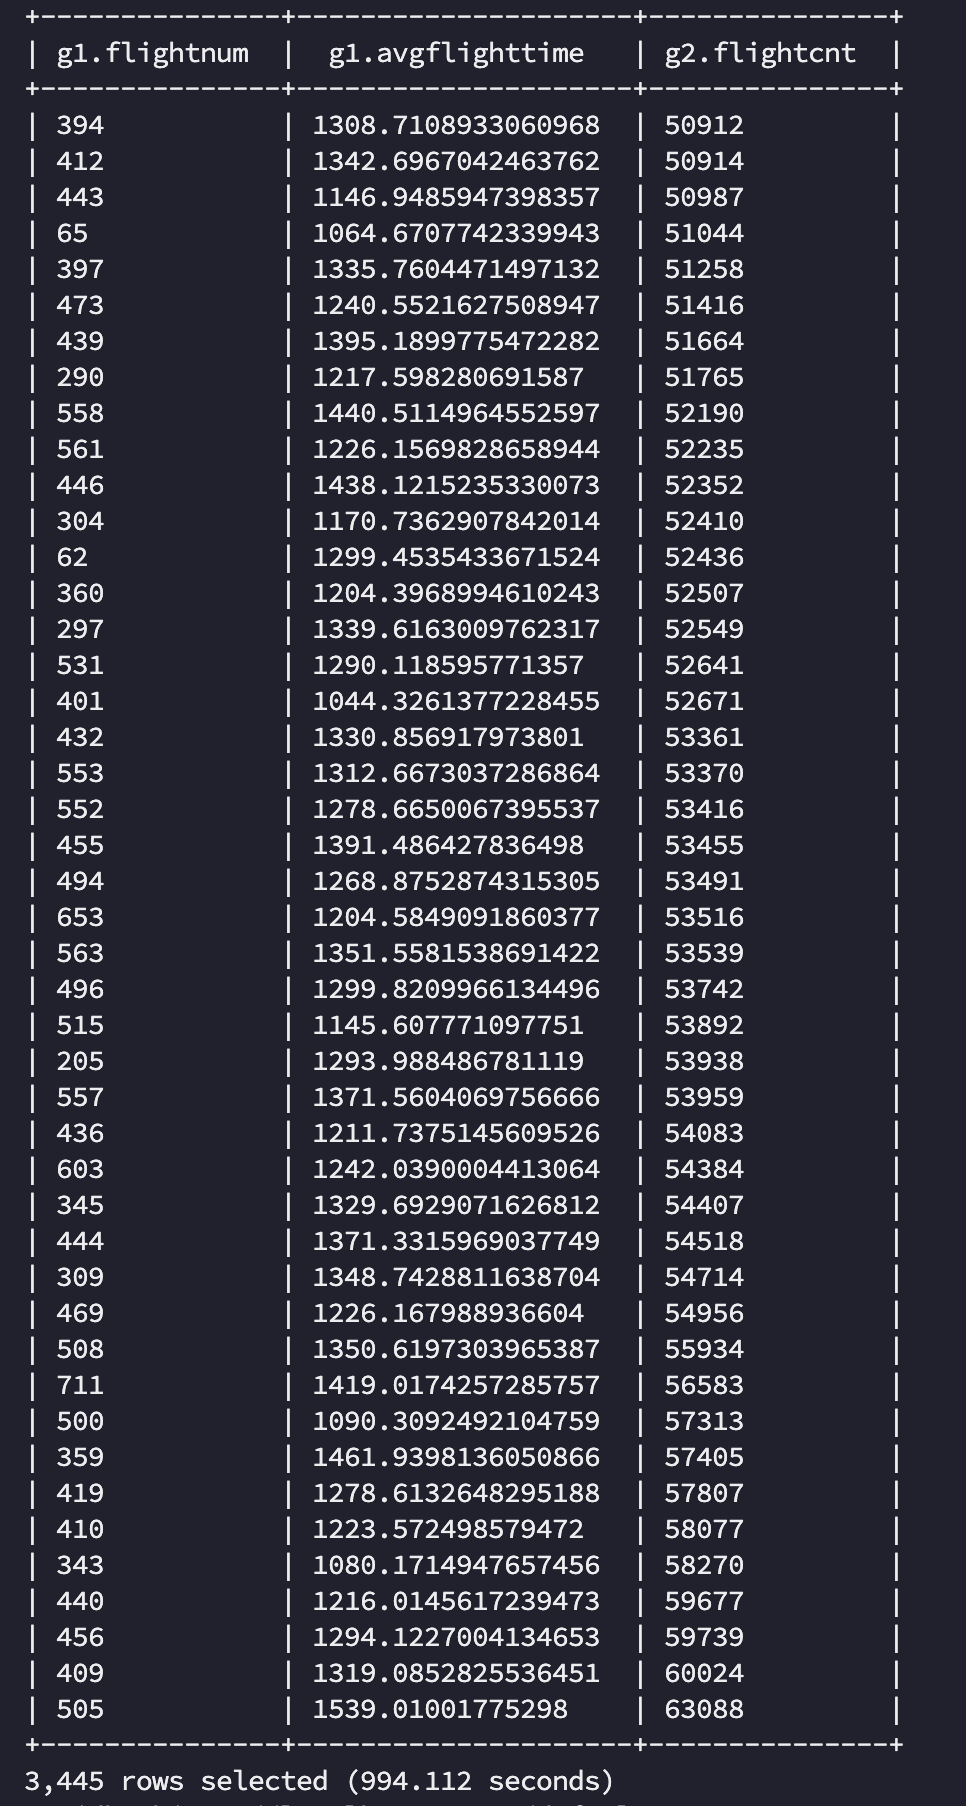
MR, Tez 로 각각 수행한 결과는 아래와 같이 확인할 수 있었습니다.
1. Hive on MR
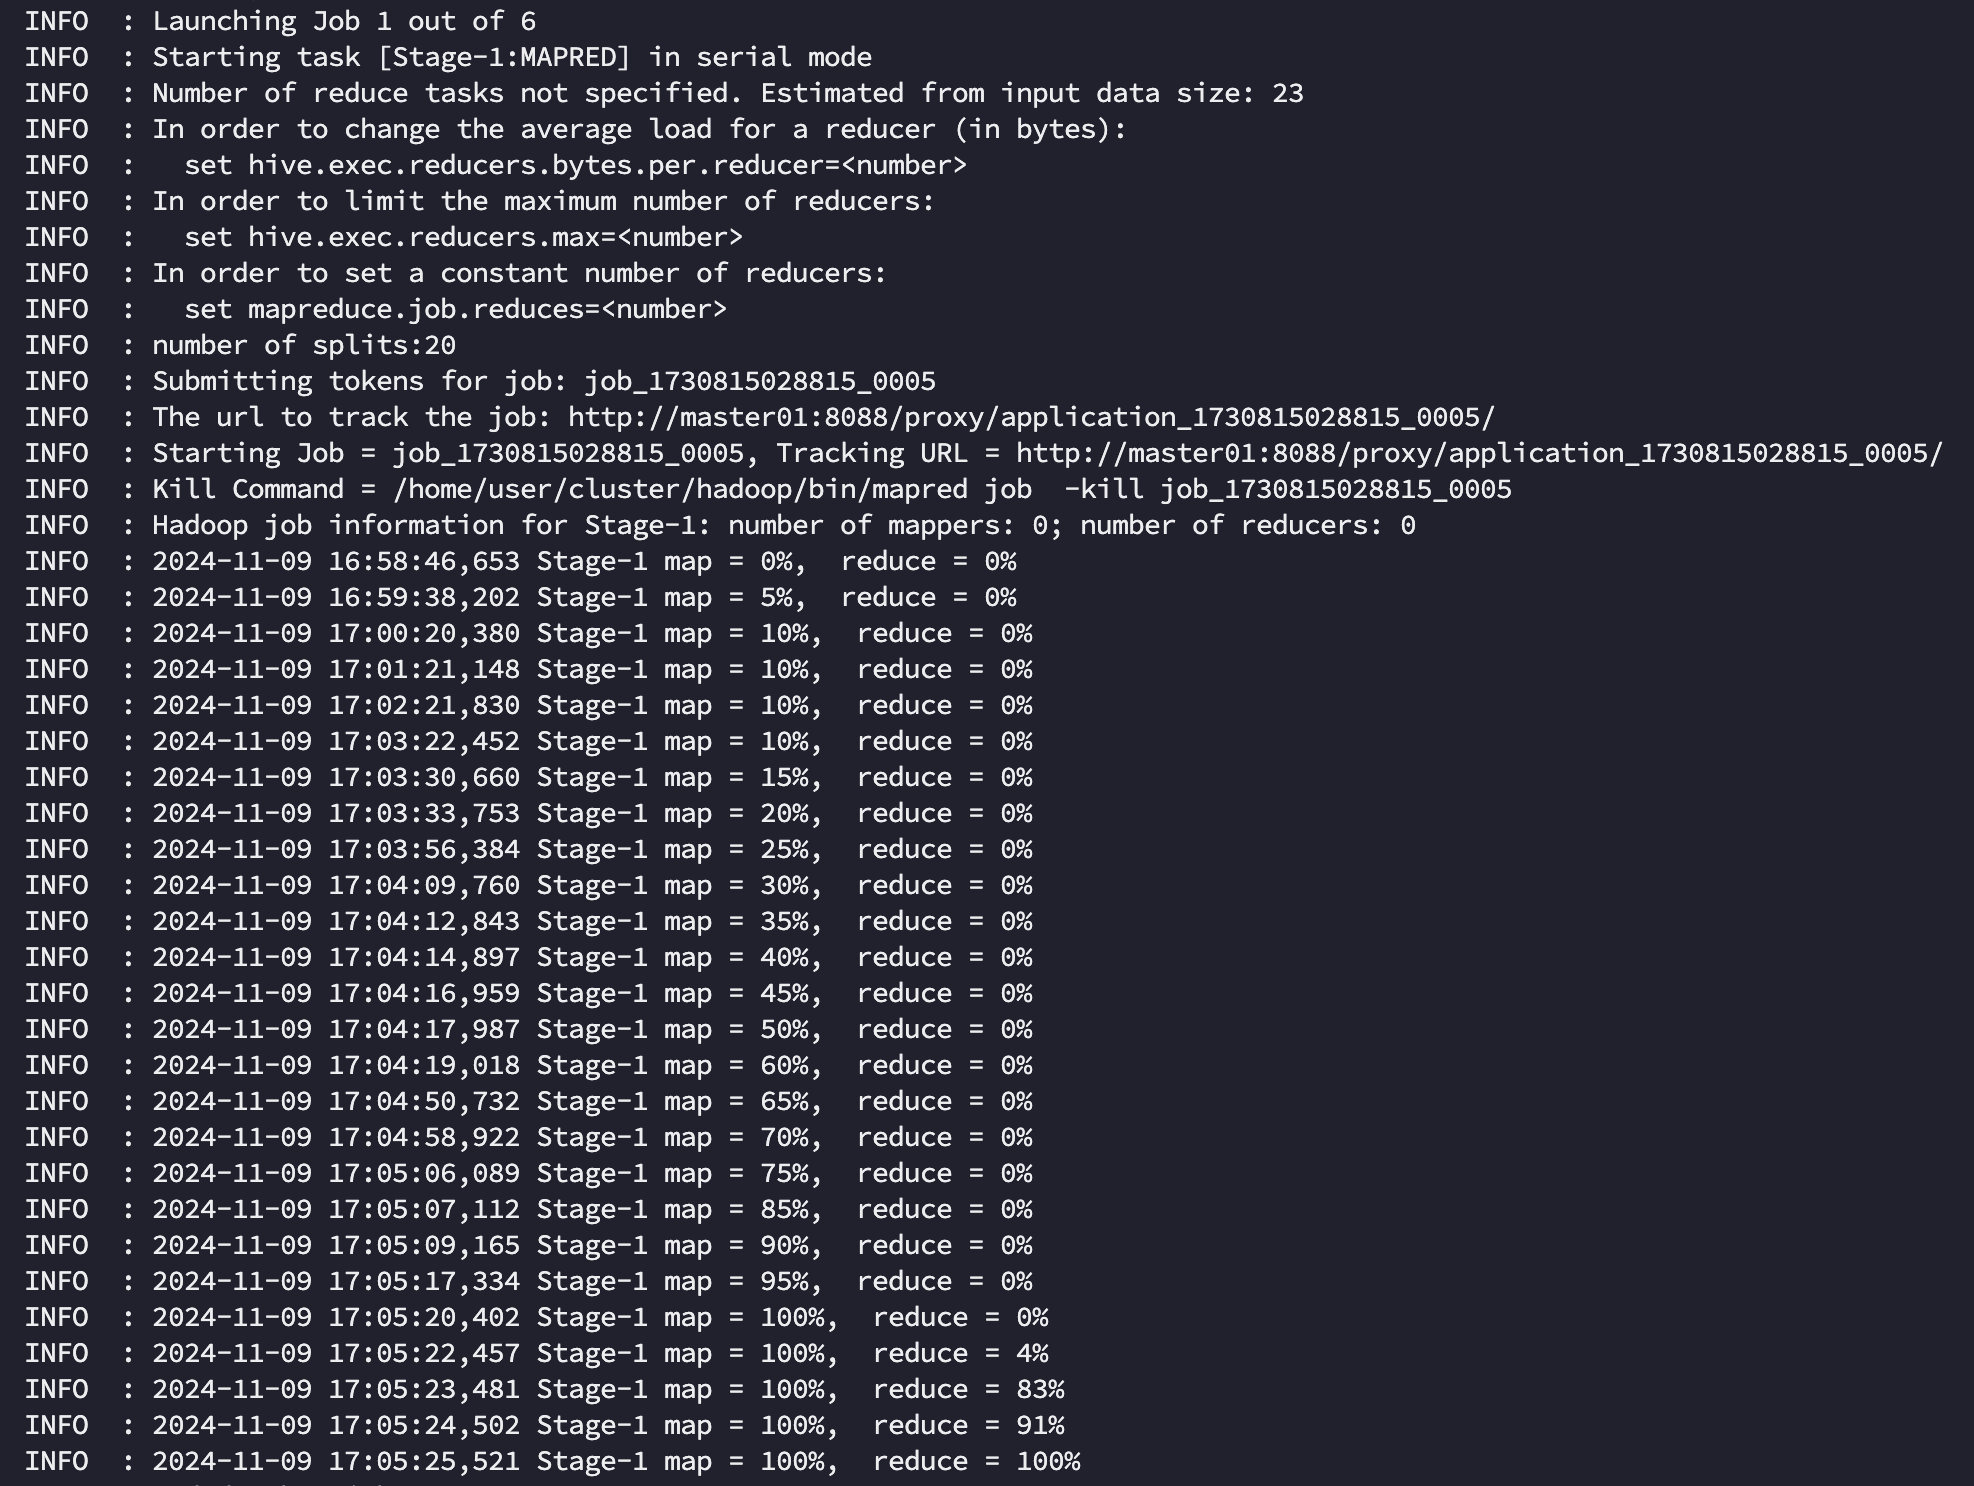
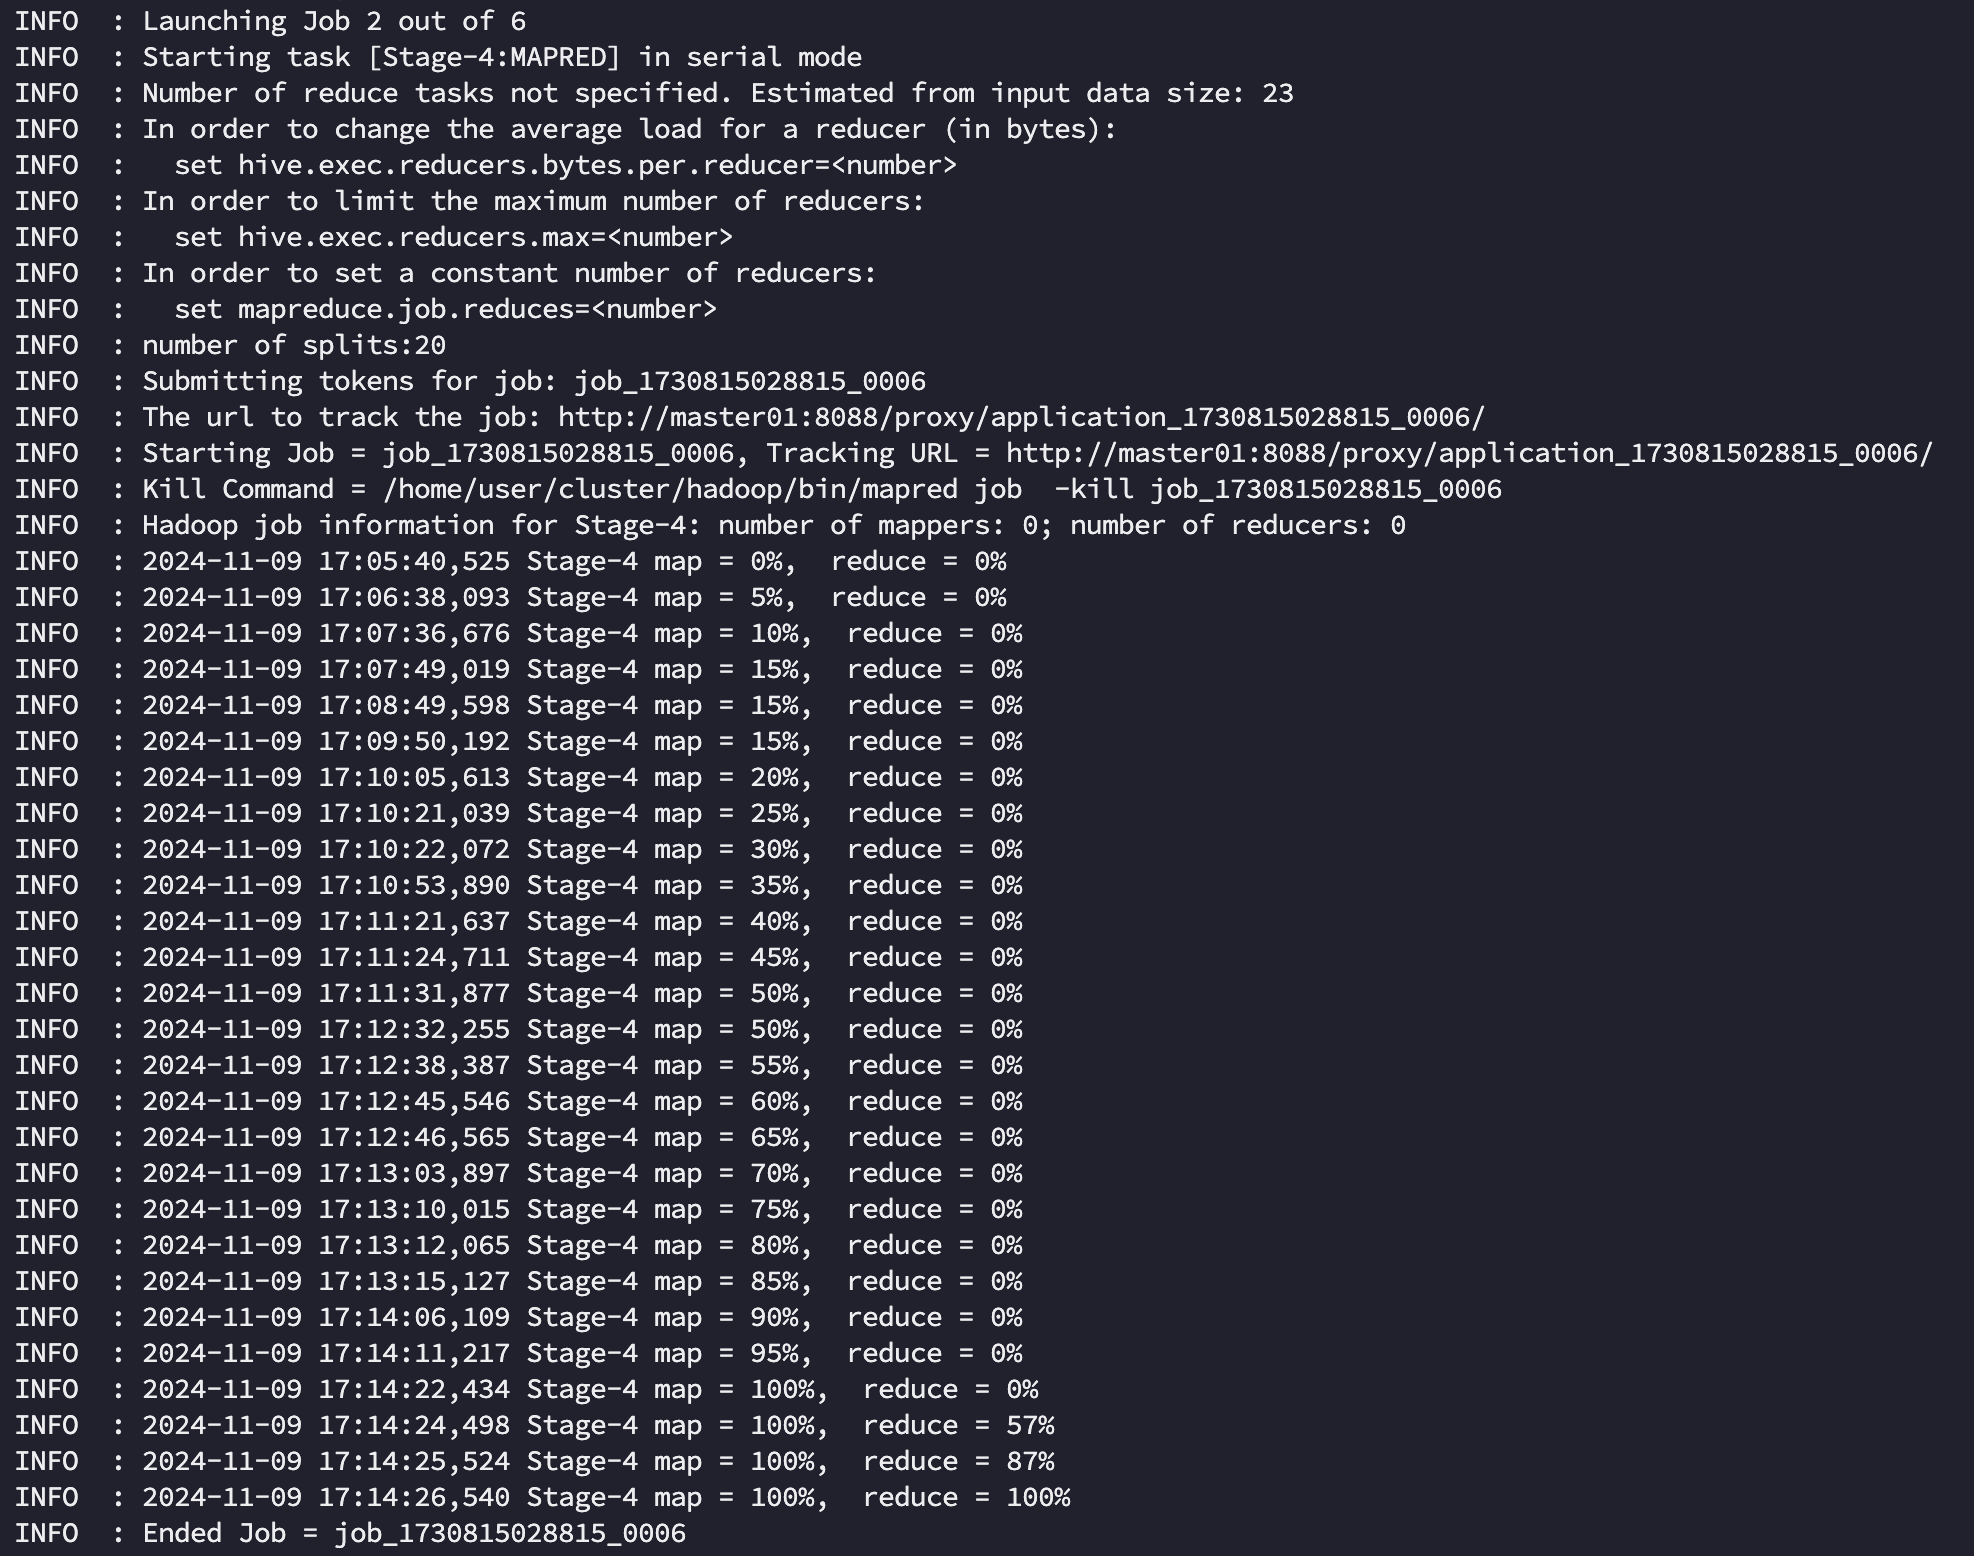
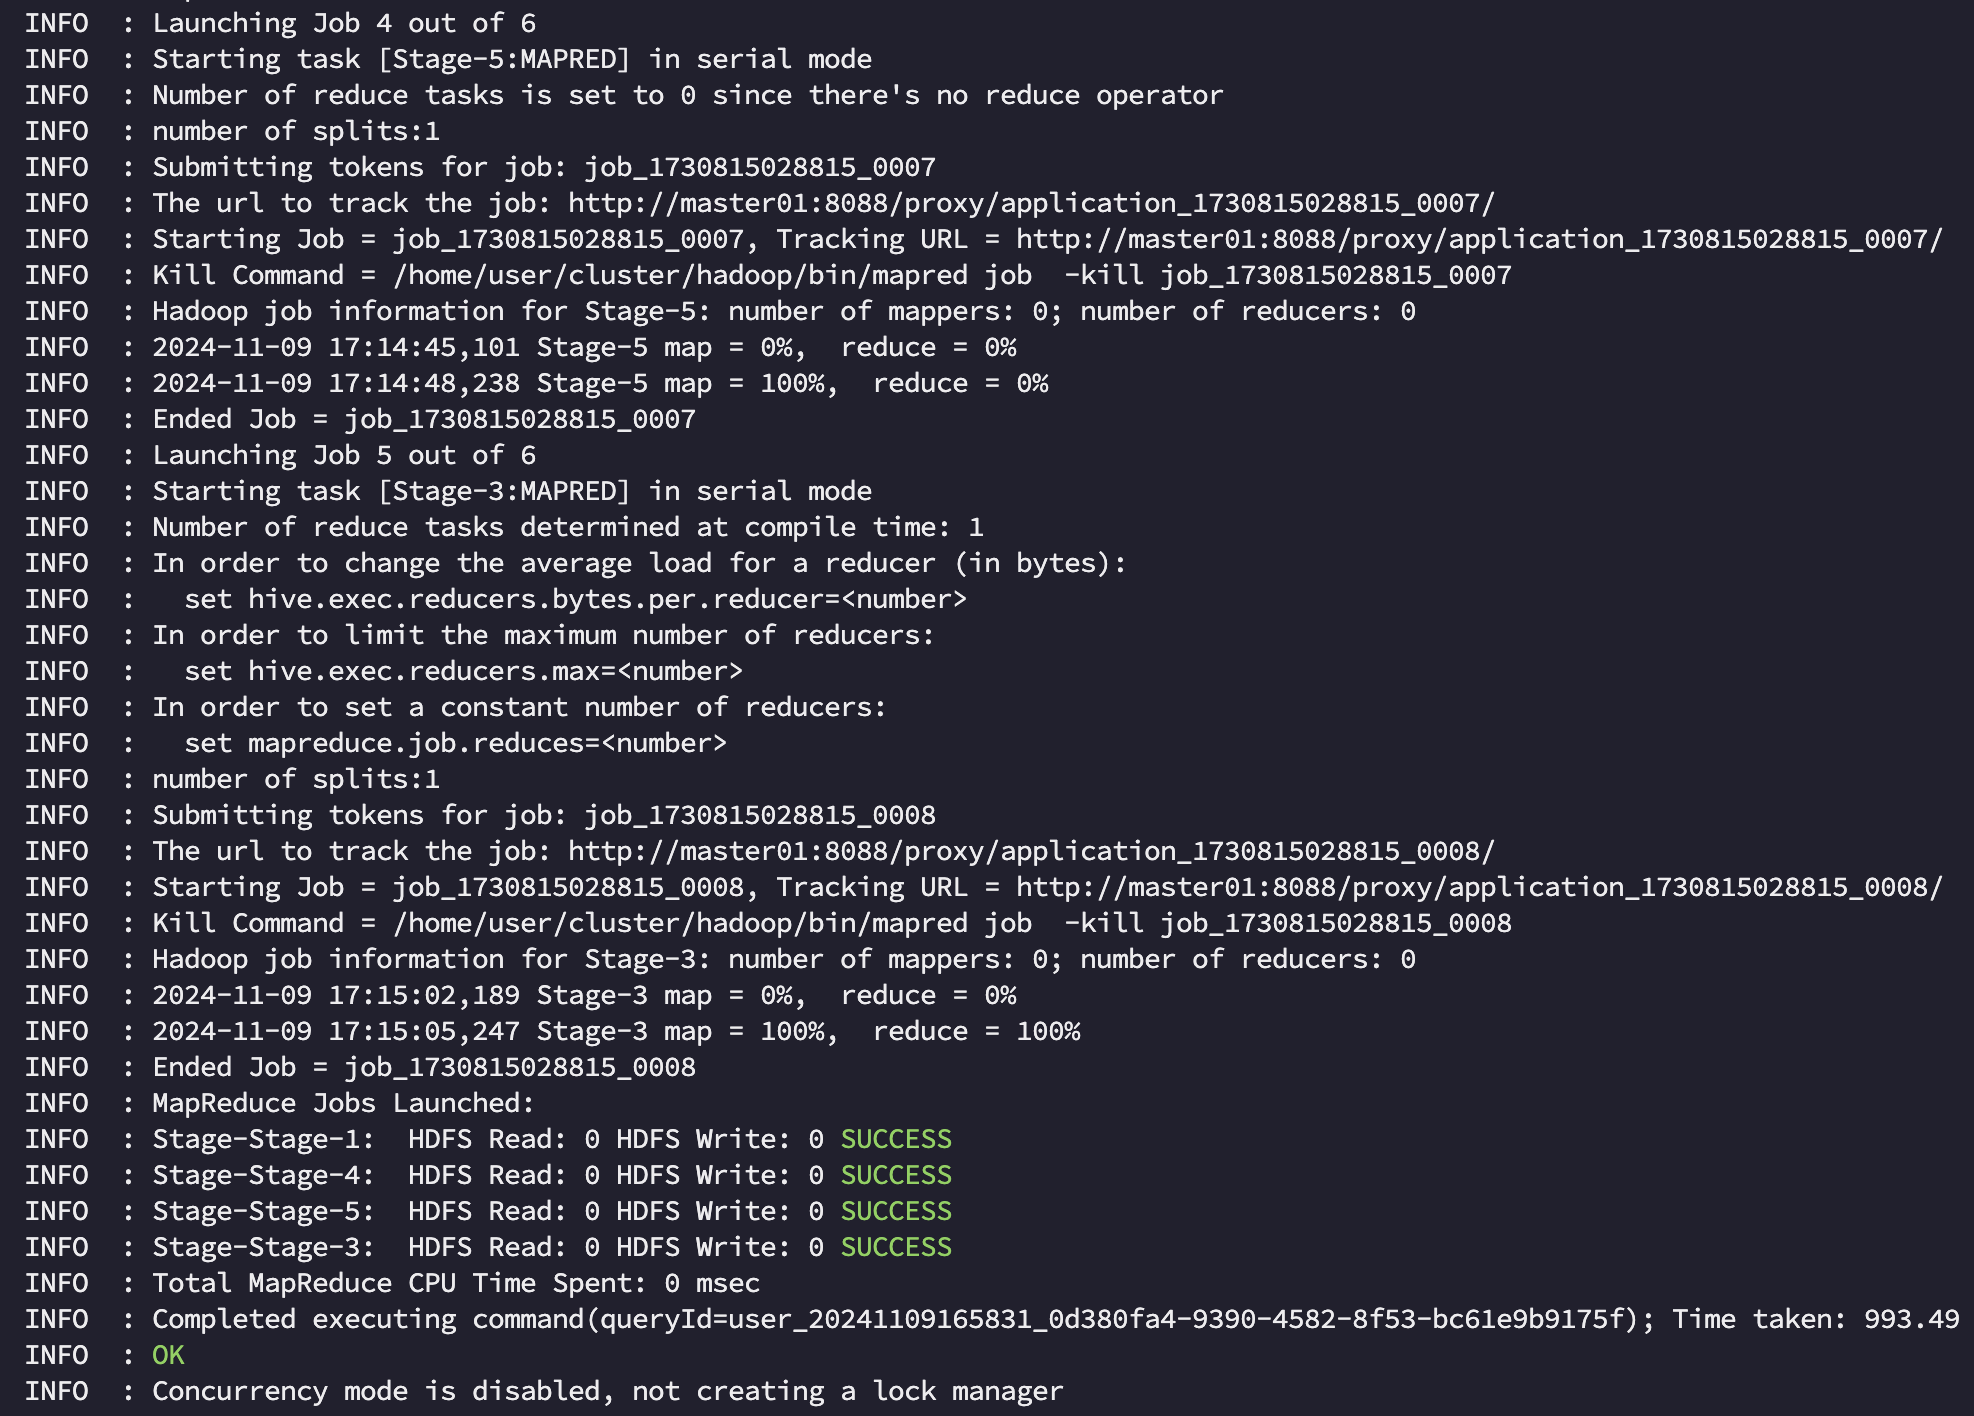
hive on mr 에서는 전체 작업이 994s 가 소요되었습니다. 작업 자체는 총 4개의 stage 로 구분되어 실행되었으며 [Stage-1:MAPRED], [Stage-4:MAPRED] 는 각각 airline 에서 g1, g2 를 만드는데, [Stage-5:MAPRED], [Stage-3:MAPRED] 은 각각 join 과 order by 를 위해 소요되었음을 알 수 있었습니다.
Stage 와 Job 의 차이는?
- Stage
Stage는 쿼리 실행의논리적 단계를 의미하며, 일반적으로 SELECT, JOIN, GROUP BY, ORDER BY와 같은 SQL 연산에 따라 나뉩니다. 데이터 처리 단계별로 분리되어 있어 JOIN과 GROUP BY가 있다면, 각각 별도의 Stage로 분리됩니다. Hive는 각 Stage에서 필요한 연산을 수행하고, 해당 Stage가 완료된 후에야 다음 Stage로 진행됩니다.- Job
Job은 MapReduce작업 단위로, 각 Stage를 MapReduce Job으로 변환하여 실제로 실행합니다. 각 Stage에서 필요한 연산이 복잡할 경우 하나의 Stage가 여러 개의 Job으로 분할될 수도 있습니다. 예를 들어, 대규모 데이터에 대해 JOIN을 수행할 때 여러 단계로 나눠 처리해야 할 수도 있습니다. Job은 서로 독립적으로 수행할 수 있지만, Stage의 종속성에 따라 순차적으로 실행됩니다.
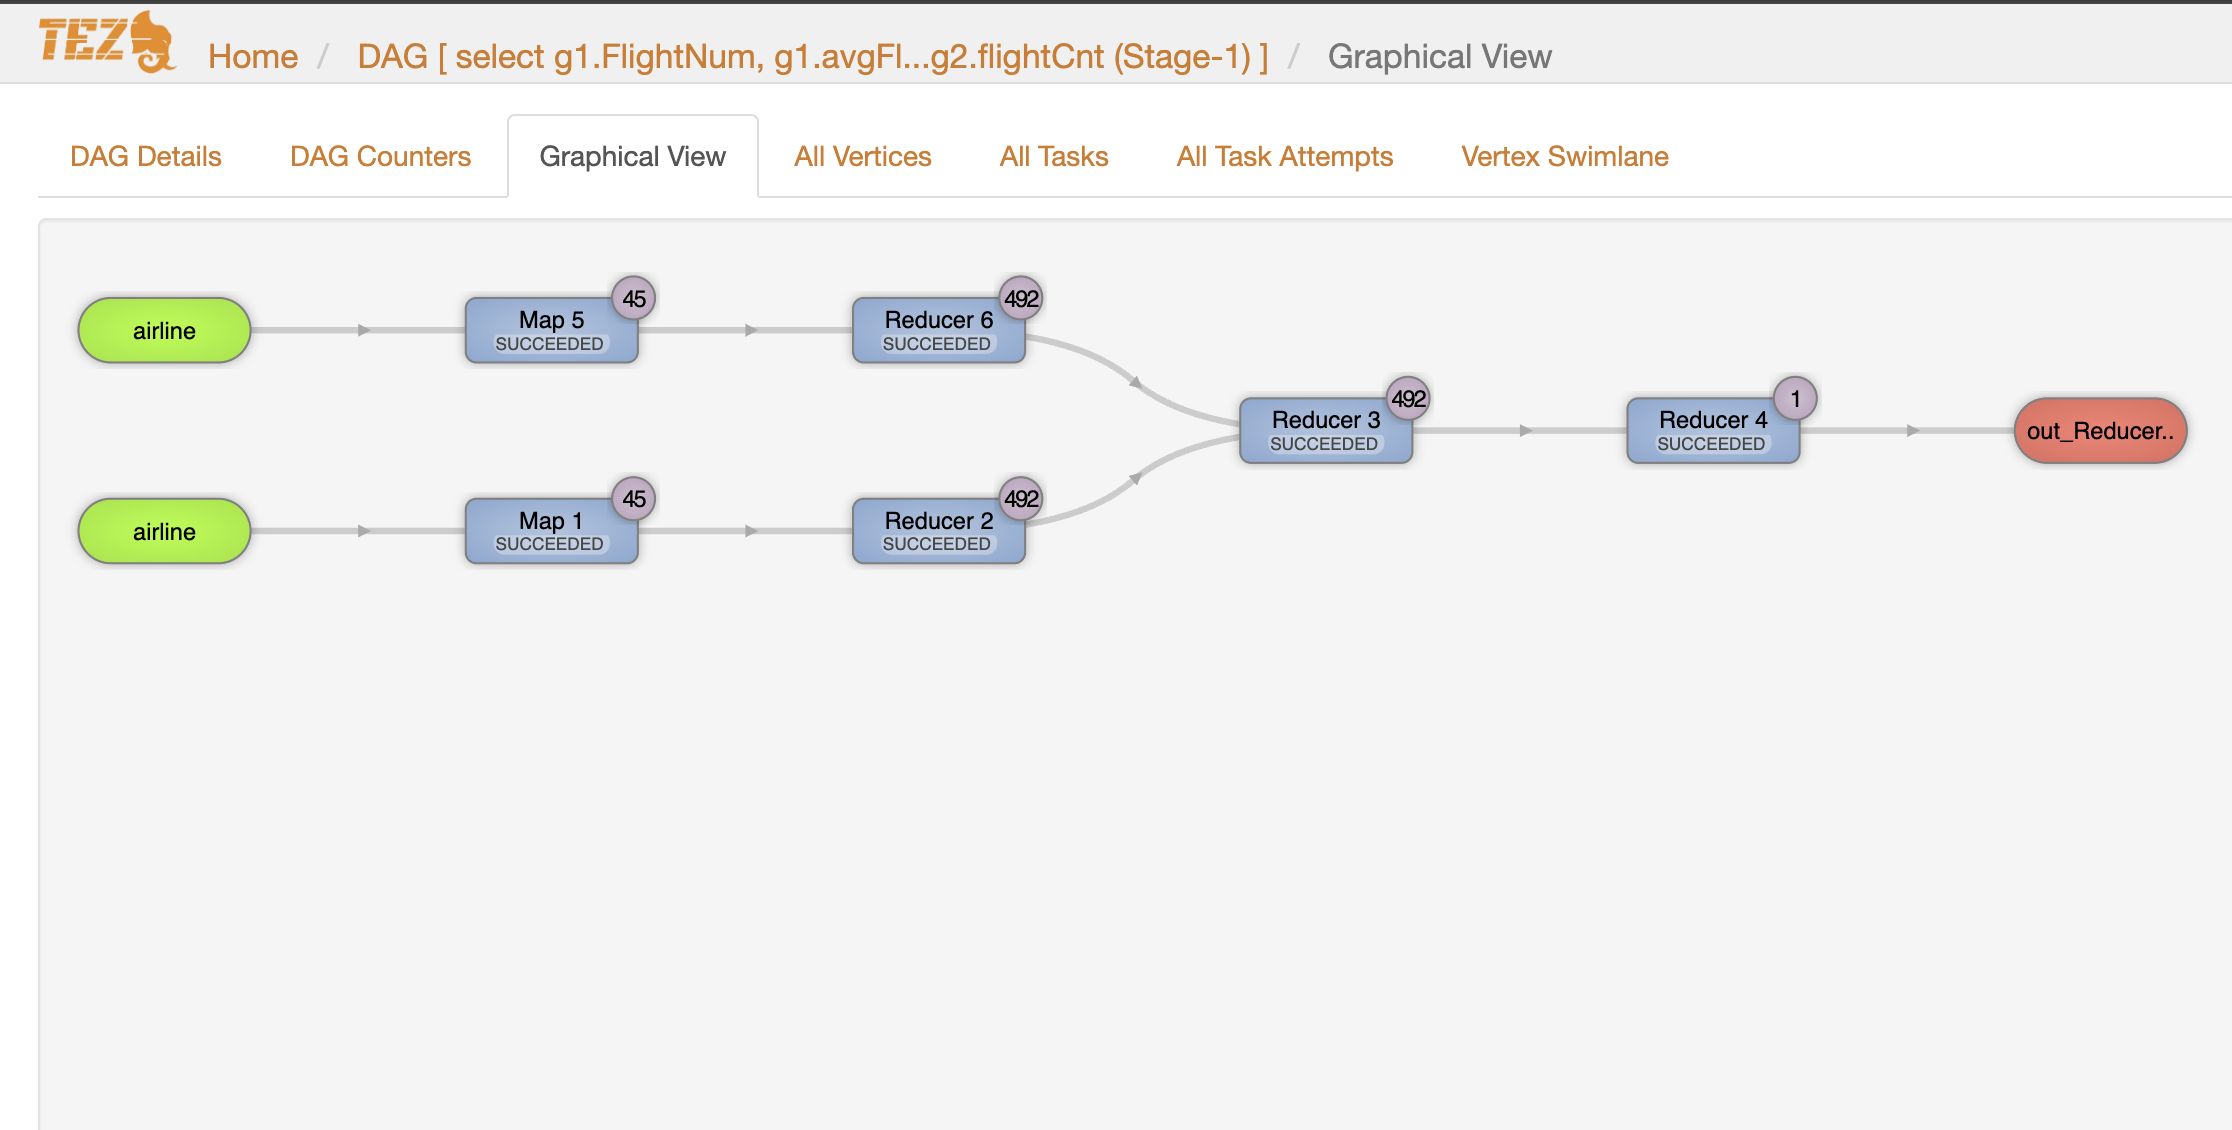
2. Hive on Tez
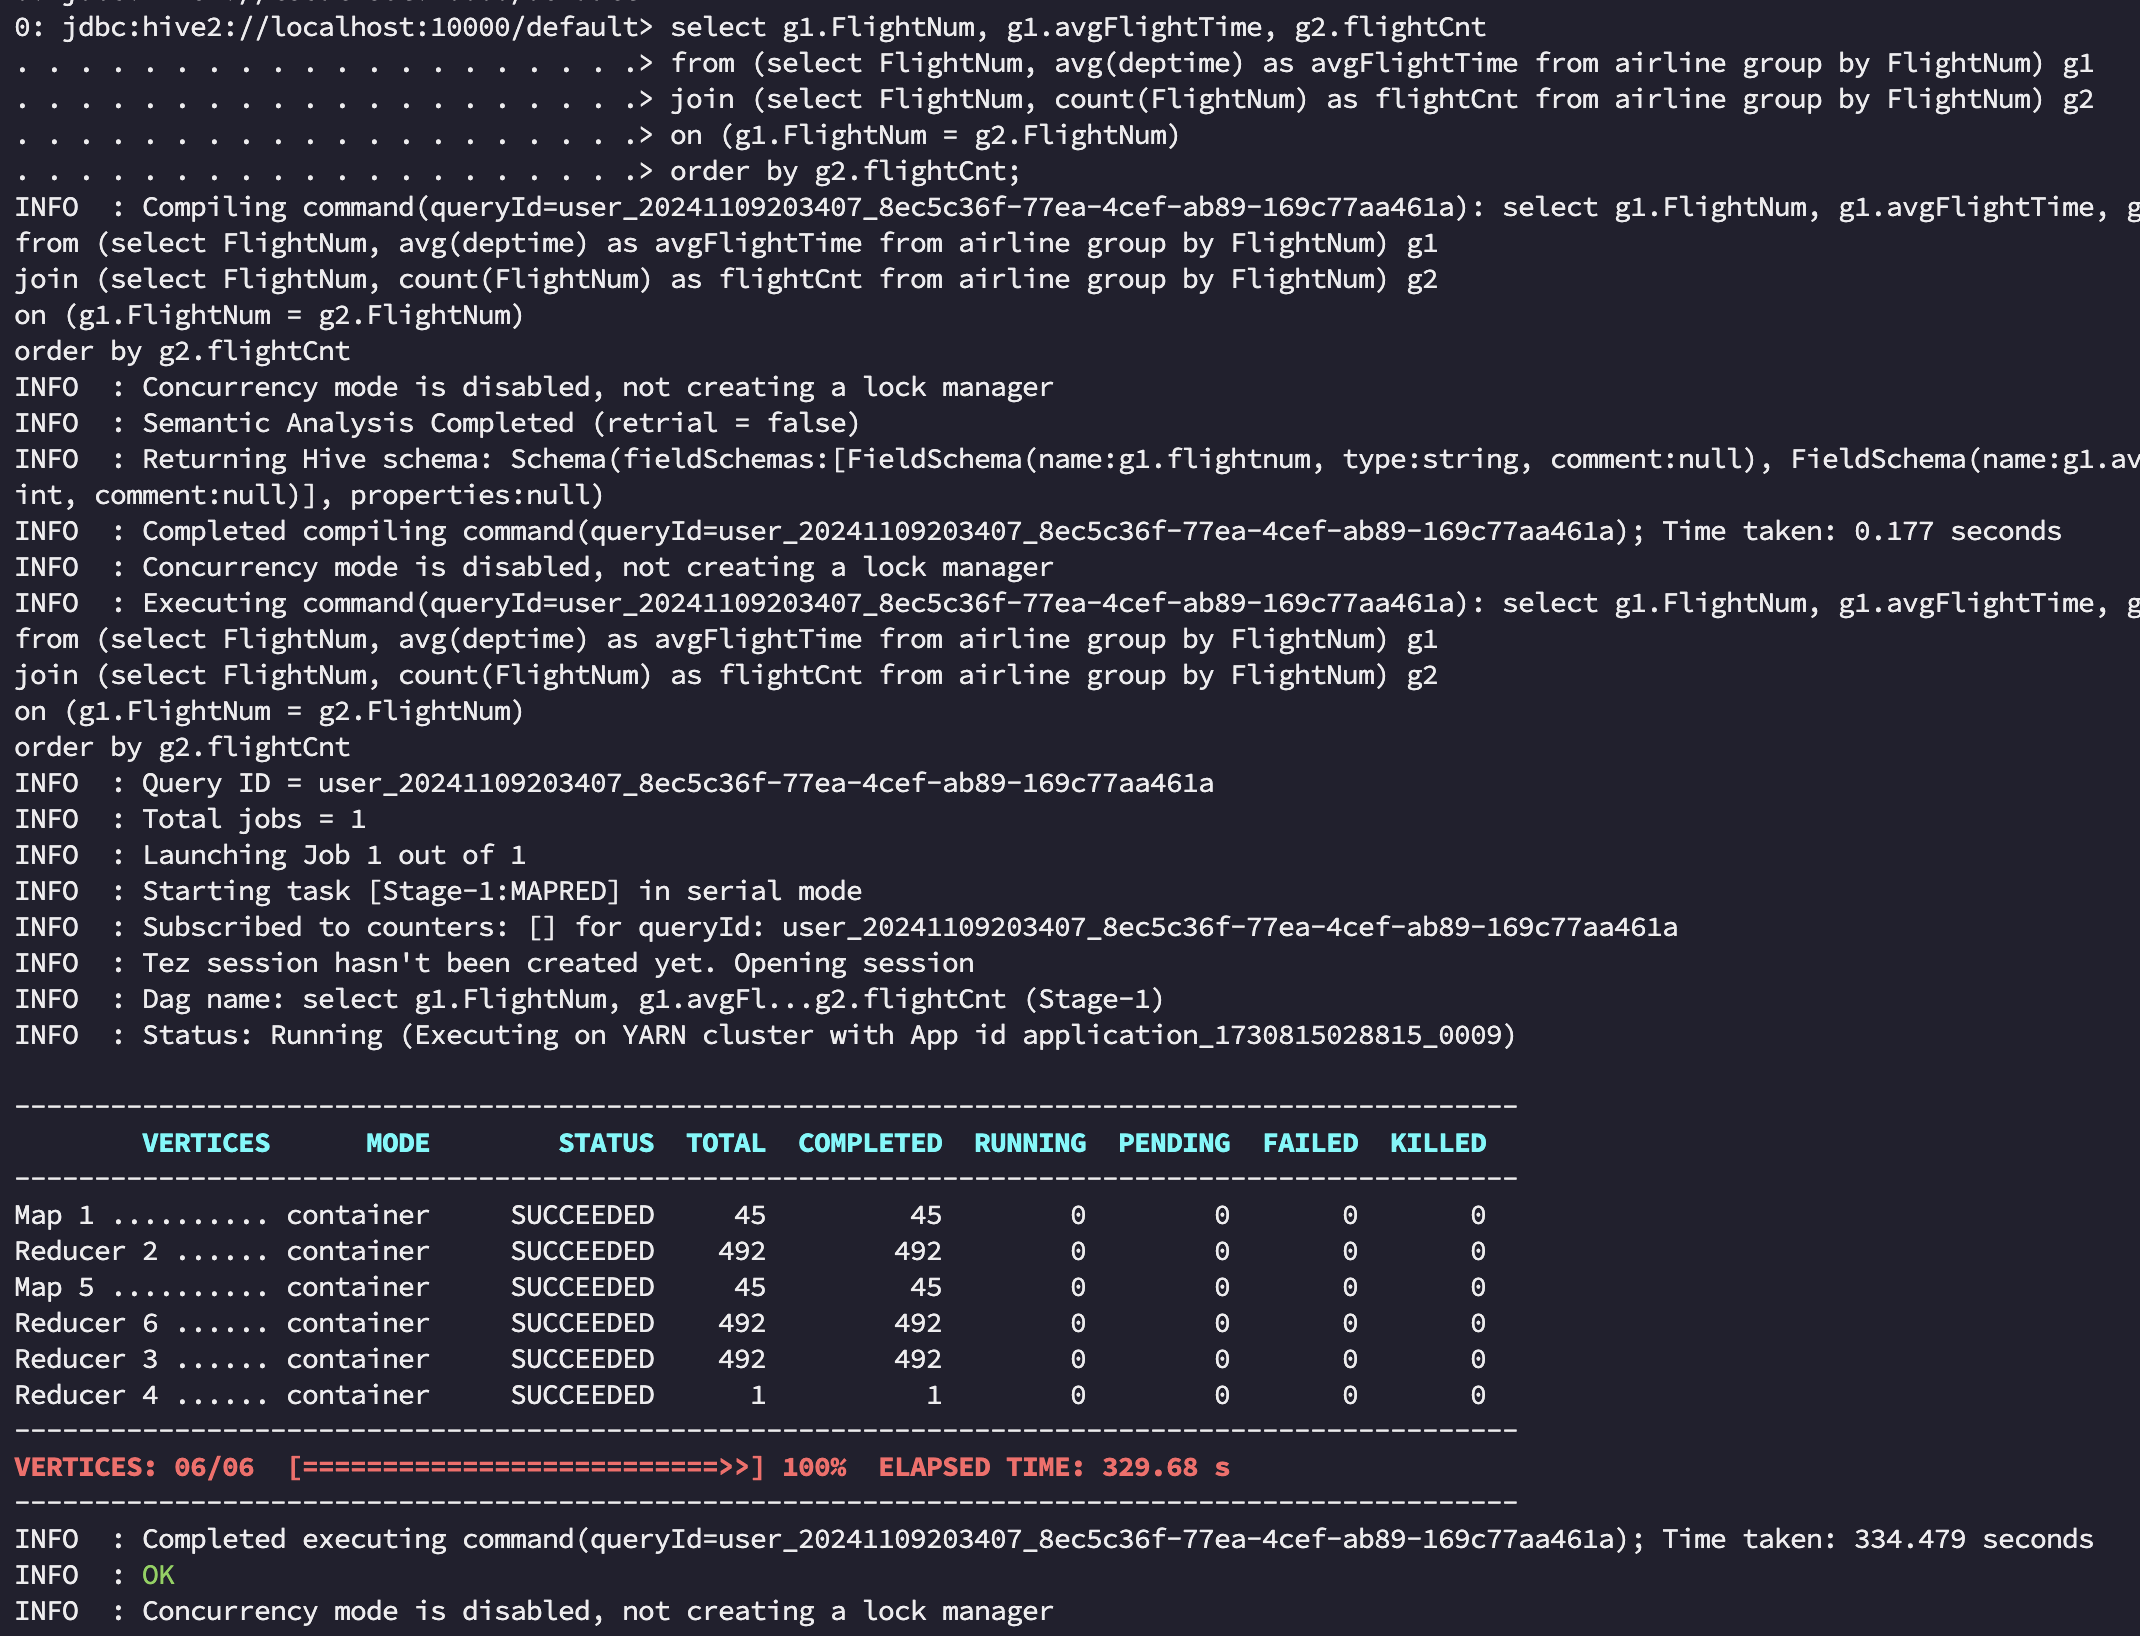
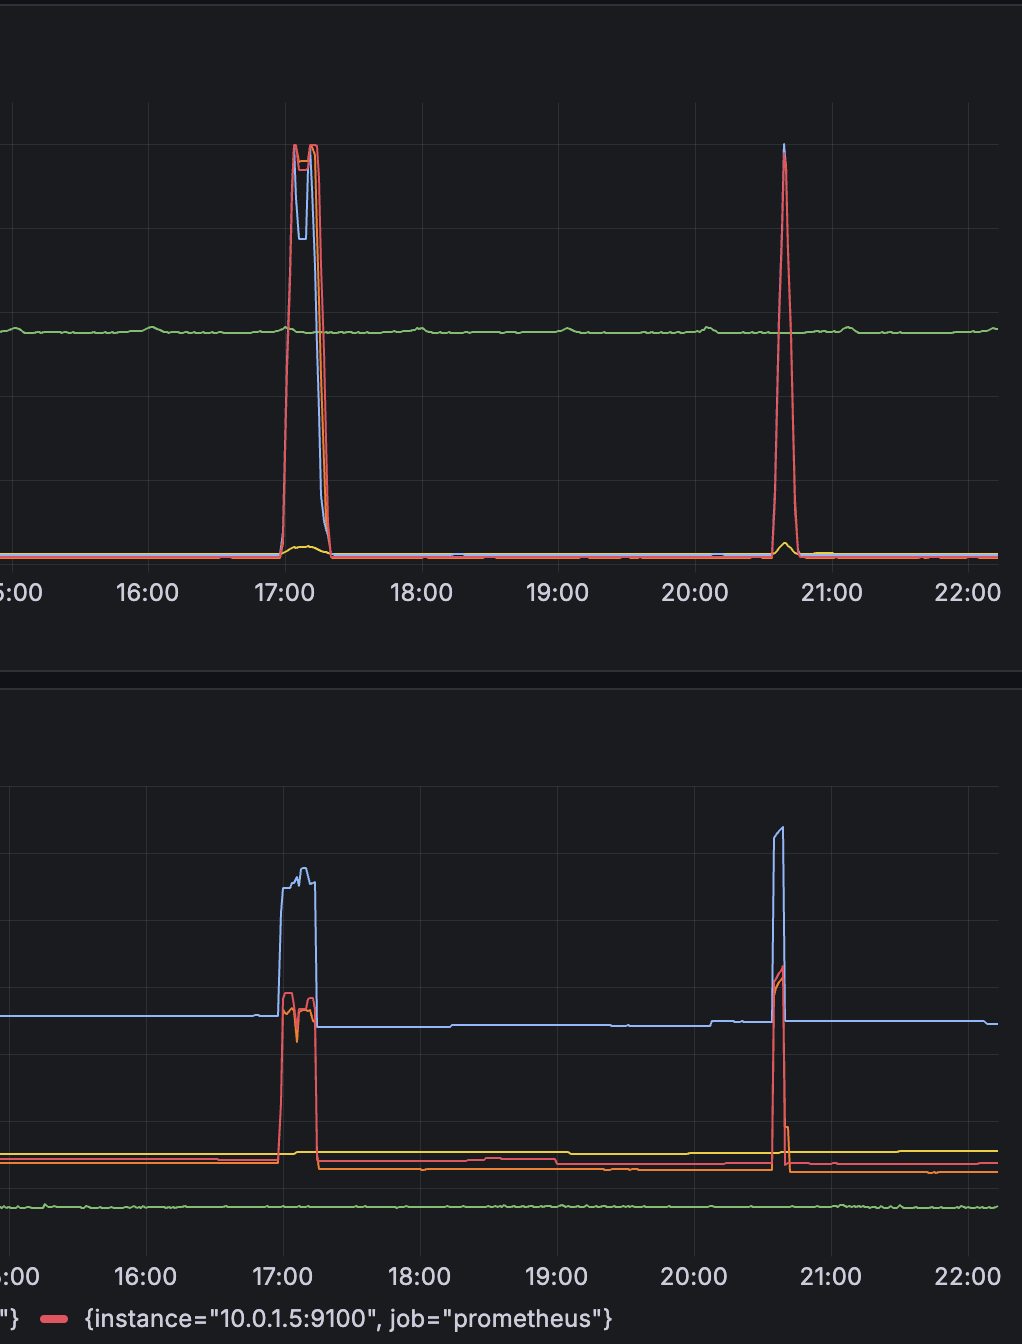
tez 에서는 전체 작업이 334s 로 mr 에 비해 약 3배 정도 성능 개선이 있었습니다. 기존 여러 Stage를 하나의 DAG로 묶어서 실행하고, 중간 단계에서 불필요한 작업을 없애고 mr로 치면 [Stage-1:MAPRED], [Stage-4:MAPRED] 작업의 결과를 바로 Join 시켜 HDFS write/read 과정을 생략하였고 메모리나 임시 디스크에 중간 데이터를 저장해 Stage 간 데이터 전달을 더 빠르게 수행할 수 있었습니다. 이 과정에서 메모리 사용률은 MR 작업에 비해 높게 나타난 것도 확인할 수 있었습니다.
Hive on Tez 에서 성능 개선하기
이번엔 이어서 Hive on Tez 에서 성능을 추가호 개선시킬 수 있는 방법을 정리해 보겠습니다. 이전 포스팅에서 중복되는 내용은 최대한 배제하였습니다.
메모리 최적화
Tez는 인메모리 처리를 지원하므로, 메모리 설정을 적절히 조정하는 것이 중요합니다. Tez 메모리 설정은 각 태스크의 메모리 설정을 조정하여 적절한 자원을 할당합니다. 기본적으로 Tez는 YARN과 함께 동작하므로, YARN의 자원 설정도 중요한 영향을 미칩니다. 아래 설정을 통해 태스크 당 메모리를 조정할 수 있으며, 쿼리 복잡도에 따라 적절한 메모리 크기를 설정합니다. 다만 쿼리가 메모리 부족으로 인해 디스크 스왑을 많이 사용하지 않도록 주의해야 합니다.
1
2
set tez.task.resource.memory.mb=4096;
set hive.tez.container.size=4096;
Dynamic Partition Pruning (동적 파티션 절감)
Dynamic Partition Pruning 은 Tez에서 성능을 크게 향상시킬 수 있는 중요한 기능입니다. 이는 join 시 불필요한 파티션을 읽지 않도록 자동으로 최적화하는 기능입니다. 이 설정을 통해 join 쿼리에서 동적 파티션 절감을 활성화하여 불필요한 파티션을 읽지 않도록 최적화할 수 있습니다.
1
2
3
set hive.optimize.ppd=true;
set hive.optimize.dynamic.partition=true;
set hive.auto.convert.join=true;
LLAP(Low Latency Analytical Processing) 사용
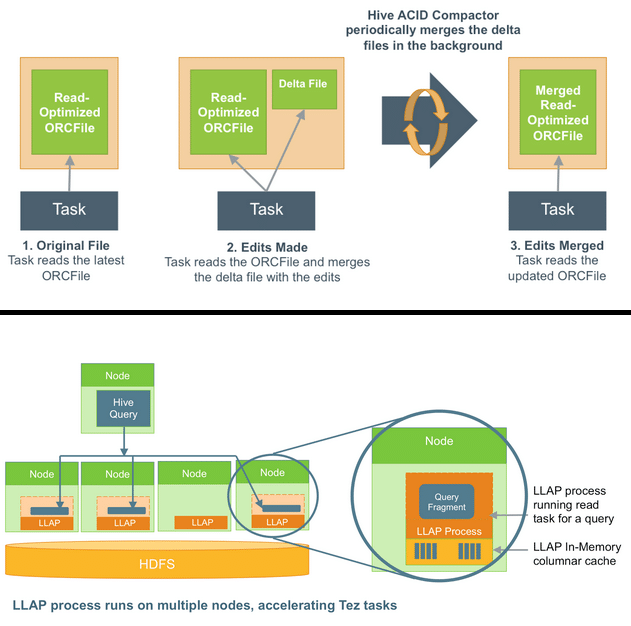 LLAP(Low Latency Analytical Processing)
LLAP 는 작업을 실행한 데몬을 계속 유지하여, 핫 데이터를 캐슁하여 할 수 있어 빠른 속도로 데이터를 처리하게 하는 기술입니다. 인메모리 데이터 캐싱 및 병렬 처리를 통해 쿼리 응답 시간을 단축할 수 있으며 LLAP를 사용하면 테이블 데이터가 메모리에 캐싱되므로, 반복적인 쿼리에서 더 빠른 응답을 얻을 수 있습니다. OLAP(온라인 분석 처리) 환경에 매우 유용합니다.
1
set hive.execution.mode=llap;
Tez Shuffle 메모리 최적화
Tez는 Shuffle 과정에서 대량의 데이터를 메모리에서 처리하므로, Shuffle 관련 설정을 최적화하면 성능을 크게 개선할 수 있습니다. 이 설정을 통해 Shuffle 단계에서 사용하는 메모리 크기를 적절히 조정할 수 있습니다. 기본값은 0.2이지만, 더 큰 값을 할당함으로써 성능을 개선할 수 있습니다.
1
set tez.runtime.shuffle.memory.limit.percent=0.5;
Tez DAG Parallelism (DAG 병렬 처리)
Tez는 쿼리를 DAG 로 변환하여 처리하므로, 병렬 실행 단계를 늘림으로써 성능을 개선할 수 있습니다. 이 설정을 통해 DAG를 병렬로 실행할 수 있는 최대 태스크 수 를 설정할 수 있습니다. 복잡한 쿼리를 더 빠르게 실행할 수 있도록 병렬성을 높일 수 있습니다.
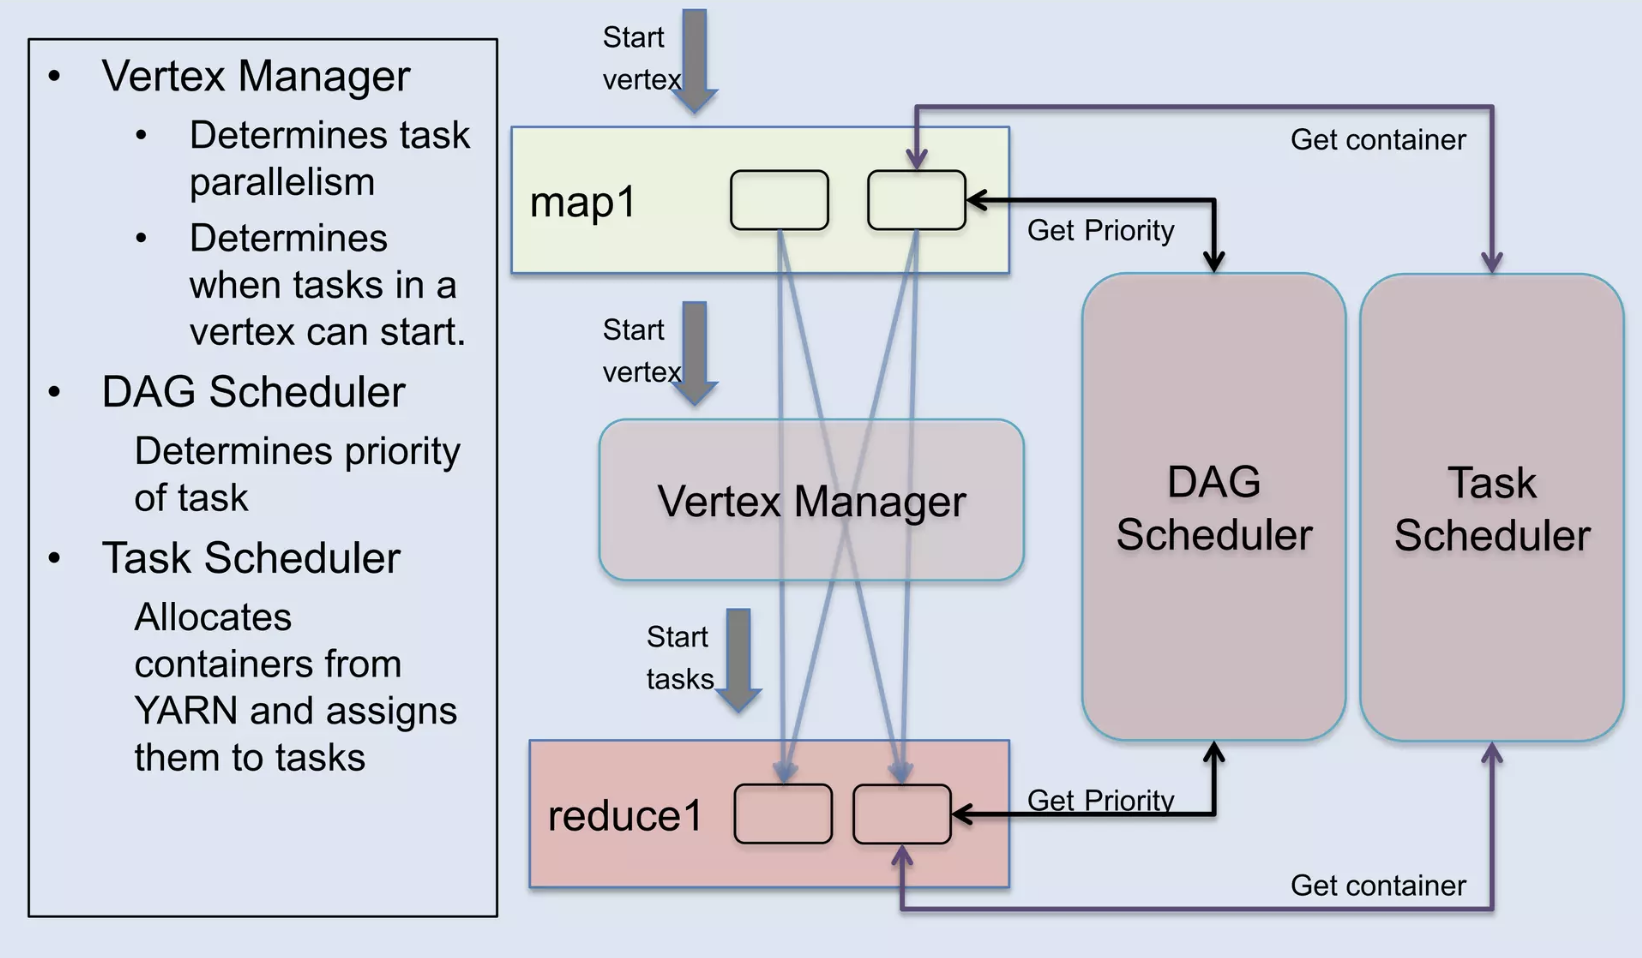 LLAP(Low Latency Analytical Processing)
다만 Map, Reduce 에 대한 병렬화는 자동적으로 조절되며 Parallelism 에 대한 더 자세한 내용은 참고 slide 원문을 참조 부탁드립니다.😄
1
set tez.am.dag.submit.max.parallelism=16;
Intermediate Data Caching (중간 데이터 캐싱)
Tez에서 중간 데이터를 캐싱하여, 여러 단계의 태스크 간에 데이터 전달 속도를 높일 수 있습니다. 중간 데이터 압축을 사용하여 중간 결과가 디스크에 저장될 때 압축하고, I/O 성능을 향상시킵니다.
1
set tez.runtime.intermediate.output.compression.codec=SNAPPY;
정리하며
끝으로 성능 개선을 위한 사전작업으로 가장 필요한 것은 정확한 로그가 남을 수 있게 세팅하는 부분일 것입니다. 저는 하둡 3.2.4 버전을 설치해서 사용하고 있는데 성능 비교를 위해서는 실행한 로그들을 제대로 보관하는 과정이 필요했습니다. 따라서 yarn application history server 와 job history 서버를 두개 다 세팅하여 yarn application 에 대한 로그와 함께 mr job 이 어떻게 동작했는지에 대한 로그를 남겨두는 작업부터 시작했고, tez의 경우 yarn application history 의 tracking ui 를 tez-ui 로 넘어가게끔 세팅했습니다. 아래는 이와 관련된 xml 세팅 정보입니다.
history server 세팅 시 주의할 점
history server 를 세팅하면서 실수했던 부분 중 하나는 바로yarn application history server와job history server는동일 노드에 띄울 수 없다는 점입니다. 저는 다행히 master-node를 이중화 구성해 두었으므로 master01 노드 에는 yarn application history server 를 띄우고 master02 노드에는 job history server 를 각각 분리 해 실행시키는 방법을 사용했습니다.
[ yarn-site.xml ]
1
2
3
4
5
6
7
8
9
10
11
12
13
14
15
16
17
18
19
20
21
22
23
24
25
26
27
28
29
30
31
32
33
34
35
36
37
38
39
40
41
42
43
44
45
46
47
48
49
50
51
52
53
54
55
56
...
    <!-- ApplicationHistoryServer 설정 -->
    <property>
        <name>yarn.timeline-service.enabled</name>
        <value>true</value>
    </property>

    <property>
        <name>yarn.timeline-service.generic-application-history.enabled</name>
        <value>true</value>
    </property>

    <property>
        <description>The hostname of the Timeline service web application.</description>
        <name>yarn.timeline-service.hostname</name>
        <value>10.0.1.1</value><!-- tez-ui 위해 ip 명시 -->
    </property>

    <property>
      <name>yarn.timeline-service.webapp.address</name>
      <value>10.0.1.1:8188</value> <!-- 모든 인터페이스(tez포함) 에서 접속 가능하도록 0.0.0.0으로 설정 -->
    </property>

    <property>
      <description>Enables cross-origin support(CORS) for web services where cross-origin web response headers are needed. ex) javascript making a web services request to the timeline server.</description>
      <name>yarn.timeline-service.http-cross-origin.enabled</name>
      <value>true</value>
    </property>

    <property>
      <name>yarn.timeline-service.http-cross-origin.allowed-origins</name>
      <value>*</value>
    </property>

    <property>
      <description>Publish YARN information to Timeline Server</description>
      <name> yarn.resourcemanager.system-metrics-publisher.enabled</name>
      <value>true</value>
    </property>

    <!-- 로그 집계 기간 설정 (예: 하루) -->
    <property>
        <name>yarn.log-aggregation.retain-seconds</name>
        <value>86400</value>
    </property>

    <!-- 로그 저장을 위한 HDFS 경로 설정 -->
    <property>
        <name>yarn.nodemanager.remote-app-log-dir</name>
        <value>/tmp/logs</value>
    </property>
    <property>
        <name>yarn.nodemanager.remote-app-log-dir-suffix</name>
        <value>logs</value>
    </property>
...
[ mapred-site.xml ]
1
2
3
4
5
6
7
8
9
10
11
12
13
14
15
16
17
18
19
20
21
22
23
24
25
...
    <property>
        <name>mapreduce.framework.name</name>
        <value>yarn-tez</value>
    </property>

    <property>
        <name>mapreduce.jobhistory.done-dir</name>
        <value>/tmp/hadoop-yarn/staging/history/done</value>
    </property>

    <property>
        <name>mapreduce.jobhistory.intermediate-done-dir</name>
        <value>/tmp/hadoop-yarn/staging/history/done_intermediate</value>
    </property>

    <property>
        <name>mapreduce.jobhistory.address</name>
        <value>master02:10020</value>
    </property>
    <property>
        <name>mapreduce.jobhistory.webapp.address</name>
        <value>master02:19888</value>
    </property>
...
Hive를 대체할 수 있는 기술로는 실시간 질의 부분에서는 Impala, SparkSQL, Trino(presto)등이 있고, Google BigQuery 나 Amazon Redshift 같은 클라우드 기반 데이터 웨어하우스 솔루션도 있습니다. 하지만 대규모 배치에서의 안정성과 히스토리컬 데이터에 대한 분석 용도로 Hive 는 아직도 유용한 기술로 보입니다. 2024년 최근까지 Hive 4.0.1 release 가 꾸준히 올라오고 있는 만큼 이번 기회에 Hive의 개념과 성능을 톺아볼 수 있어 좋았습니다. 👋
참고문헌
- https://www.slideshare.net/slideshow/w-235phall1pandey/35987386
- https://www.infoq.com/presentations/apache-tez/
- https://www.slideshare.net/slideshow/apache-tez-accelerating-hadoop-query-processing/28293743#2
- https://118k.tistory.com/1038
- https://learn.microsoft.com/ko-kr/azure/hdinsight/interactive-query/hive-workload-management
- https://www.hemantkgupta.com/p/insights-from-paper-apache-hive-from
